
Continuing on AJAX theme I thought I’d show you how to create a simple options page, and save those options using AJAX. The advantage on using AJAX on WordPress back end is that it is already loaded there by default. You might know it or not, but when you are writing a page or a post, WordPress will continually check to see what you’re doing.
Notice: This article was written in 2016. WordPress has changed a lot since then, so take this article with a grain of salt…
This in turn will lock the post if anyone is editing it, and auto save drafts while you’re writing them. I’m talking about Hartbeat API. It runs by sending certain requests to the server and getting some response, using AJAX (no refresh remember).
So this is something we can use to our advantage.
Creating options page
If you haven’t noticed it, most of my posts are used to describe the way to extend the theme. It’s mostly because when working with clients I’m creating custom themes, and add custom functionality to it – so I’ve gotten accustomed to it. Of course, all of this applies to plugins as well, since they are the ‘extension’ of the WordPress that adds different functionality.
The first thing we’ll do is create a separate .php file in which our code will be. Using Twenty Sixteen as my base I’ve created an options_page.php inside the /inc folder of the theme. We’ll add this in our functions.php file as
require_once( get_template_directory(). '/inc/options_page.php');Code language: PHP (php)Now, since we are using AJAX, we’ll need to enqueue .js file from which we’ll control our AJAX calls, tab changing, and all other functionality you can imagine (image upload, gallery upload, draggable etc.). You can also add css stylesheet for your options page as well.
/********* Enqueue Backend Scripts ***********/
	add_action( 'admin_enqueue_scripts', 'mythemeslug_backend_scripts' );

/********* Backend Scripts ***********/
if ( !function_exists( 'mythemeslug_backend_scripts' ) ) {
	function mythemeslug_backend_scripts($menu_slug) {

		if ($menu_slug == 'toplevel_page_custom_options') {
			wp_enqueue_script( 'mythemeslug_admin', get_template_directory_uri().'/js/admin.js' );
			wp_enqueue_style( 'mythemeslug_admin_style', get_template_directory_uri().'/css/admin_css.css' );
			wp_localize_script( 'mythemeslug_admin', 'mythemeslug_ajax', array(
	        	'settings_saved' => esc_html__('Settings saved', 'mythemeslug'),
			) );
		}

	}
}Code language: PHP (php)
I’ve added a menu slug, so that you enqueue these scripts and files only on your custom menu page. But how do we know our menu slug? Well, the easiest thing you can do is to put a print_r($menu_slug); inside the enqueuing function, and when you’re on your page, you’ll see the string with your page slug. Other than that – you set it yourself when creating a menu page : )
On to the options page. In normal circumstances you’d first create your page and then enqueue any scripts and stylings, but since I’ve already given you the code, you know that your page slug will be ‘custom_options’. First thing we’ll do is add our menu page by using add_menu_page function.
<?php
add_action('admin_menu', 'layout_menu_page');
if (!function_exists('layout_menu_page')) {
function layout_menu_page(){
add_menu_page( esc_html__('Custom Theme Options', 'mythemeslug'), esc_html__('Custom Theme Options', 'mythemeslug'), 'manage_options', 'custom_options', 'mythemeslug_options', 'dashicons-admin-generic', 60 );
}
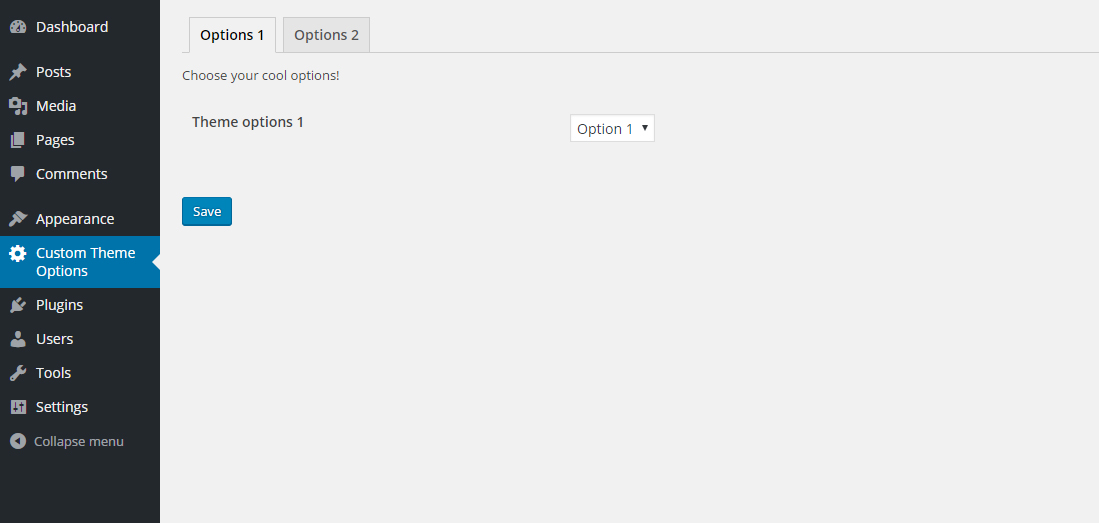
}Code language: HTML, XML (xml)This will add the menu page called Custom Theme Options to our menu on the right side with a cog icon. You can get any icon you like from here. To have something displayed on it, you’ll need to put some options in the callback function. In my case it’s called ‘mythemeslug_options’ (creative, right? :D). In it you’ll add a form with a save button. Once you’ve added your form, you’re basically set, because you can just hit submit button all your input fields, select dropdowns, checkboxes etc. will be in the global $_POST variable, so you can use that to save your options. But since we’re working with AJAX, and we don’t want our pages to be super dull, we’ll make them a bit pretty. Notice I said a bit xD
Callback function
In this example we’ll create a 2 tab options, with separate save button, but you can just as easily put just one save button and use just one form for all your options. The choice is yours.
if (!function_exists('mythemeslug_options')) {
	function mythemeslug_options(){

		$option_module  = get_option('option_module');
		$input_option_1 = get_option('input_option_1');
		$input_option_2 = intval( get_option('input_option_2') );
		$input_option_3 = stripslashes( get_option('input_option_3') );

		echo '<div class="wrap page_options">
				<h2 class="nav-tab-wrapper">
					<span class="nav-tab tab_1 nav-tab-active" data-tab="tab_1">'.esc_html__('Options 1', 'mythemeslug').'</span>
					<span class="nav-tab tab_2" data-tab="tab_2">'.esc_html__('Options 2', 'mythemeslug').'</span>
				</h2>';
		  echo '<div id="tab_1"><p>'.esc_html__('Choose your cool options!', 'mythemeslug').'</p>';
			$out = '';
			$out .= '<form id="page_options_1" class="page_options" method="post" action="#">
						<table class="form-table">
							<tbody>
								<tr>
									<td class="title">
										<h4>'.esc_html__('Theme options 1', 'mythemeslug').'</h4>
									</td>
									<td class="module_select">
										<select name="option_module" id="option_select">
											<option value="option_1" '.selected( $option_module, 'option_1', false ).'>'.esc_html__('Option 1', 'mythemeslug').'</option>
											<option value="option_2" '.selected( $option_module, 'option_2', false ).'>'.esc_html__('Option 2', 'mythemeslug').'</option>
											<option value="option_3" '.selected( $option_module, 'option_3', false ).'>'.esc_html__('Option 3', 'mythemeslug').'</option>
										</select>
									</td>
								</tr>
							</tbody>
						</table>
						<input type="submit" class="submit button button-primary" value="'.esc_html__('Save', 'mythemeslug').'"><span class="spinner"></span><span class="saved_options"></span>
						'.wp_nonce_field( 'theme_options_tab1_nonce', 'ajaxnonce_tab1', true, false ).'
					</form>
				</div>
				<div id="tab_2" class="page_options hidden"><p>'.esc_html__('Choose your other cool options!', 'mythemeslug').'</p>
					<form id="page_options_2" class="page_options_2" method="post" action="#">
						<table class="form-table">
							<tbody>
								<tr>
									<td class="input_field">
										<label for="input_option_1">'.esc_html__('Option on tab 2 number 1 (text)', 'mythemeslug').'</label>
										<input type="text" name="input_option_1" value="'.$input_option_1.'">
									</td>
									<td class="input_field">
										<label for="input_option_2">'.esc_html__('Option on tab 2 number 2 (integer)', 'mythemeslug').'</label>
										<input type="text" name="input_option_2" value="'.$input_option_2.'">
									</td>
									<td class="input_field">
										<label for="input_option_3">'.esc_html__('Option on tab 2 number 3 (code)', 'mythemeslug').'</label>
										<textarea name="input_option_3" rows="4">'.$input_option_3.'</textarea>
									</td>
								</tr>
							</tbody>
						</table>
						<input type="submit" class="submit button button-primary" value="'.esc_html__('Save', 'mythemeslug').'"><span class="spinner"></span><span class="saved_options"></span>
						'.wp_nonce_field( 'theme_options_tab2_nonce', 'ajaxnonce_tab2', true, false ).'
					</form>
				</div>';
		echo $out;
		echo '</div>
		</div>';
	}
}Code language: HTML, XML (xml)
Notice that we’re using ready WordPress styling (classes). This way we don’t have to style our own tabs. You can if you want to make your options page really pretty. Basically we’re wrapping everything in a .wrap class, then adding some titles, and placing 2 form elements with tables inside. In the first tab I’ve added a drop down, and in the second I’ve added 2 input fields and a textarea. However the input fields will take a different values and textarea will contain simple HTML code, which is important to note. Also every field needs to have its own nonce field, because we always need to be safe.
First we are pulling the options from the WordPress options table. If they are not present, we won’t have anything there so the variables will be empty. So we don’t have to worry ourselves with isset and != ” check. In my first input I’m storing just text, in second I’m storing interger value, and in the third one, I’m storing some piece of code. This is why I’m stripping any extra slashes that could be added when adding anything to the database using update_option() function. For the dropdown, I’m using a handy selected() function.
Saving the options
We are saving the options by calling on the functions that will do the saving with AJAX, so they need to be added via ‘wp_ajax_(action)‘ action hook. Since we’re on the back end side, we don’t need the ‘wp_ajax_nopriv_(action)‘ that will work for non logged in users. We need two separate actions, because we have two separate forms to save. In the same file you added your menu page put this code in:
add_action( 'wp_ajax_mythemeslug_options_tab1_save', 'mythemeslug_options_tab1_save' );

if (!function_exists('mythemeslug_options_tab1_save')) {
	function mythemeslug_options_tab1_save() {

		if (!current_user_can('manage_options')){
			wp_die('You can\'t change this!');
  		}

		if ( !wp_verify_nonce( $_POST['ajaxnonce_tab1'], 'theme_options_tab1_nonce' ) ){
			wp_die('Nonce bust!');
		}

		if ( isset($_POST['option_module']) ) {
			update_option('option_module', $_POST['option_module']);
		}

		wp_die();

	}
}


add_action( 'wp_ajax_mythemeslug_options_tab2_save', 'mythemeslug_options_tab2_save' );

if (!function_exists('mythemeslug_options_tab2_save')) {
	function mythemeslug_options_tab2_save() {

		if (!current_user_can('manage_options')){
			wp_die('You can\'t change this!');
  		}

  		if ( !wp_verify_nonce( $_POST['ajaxnonce_tab2'], 'theme_options_tab2_nonce' ) ){
			wp_die('Nonce bust!');
		}

		if ( isset($_POST['input_option_1']) ) {
			update_option('input_option_1', wp_kses_post( $_POST['input_option_1'] ) );
		}

		if ( isset($_POST['input_option_2']) ) {
			update_option('input_option_2', intval( $_POST['input_option_2'] ) );
		}

		if ( isset($_POST['input_option_3']) ) {
			update_option('input_option_3', stripslashes( $_POST['input_option_3']) );
		}

		wp_die();

	}
}Code language: PHP (php)
What we are doing is creating an action to call on AJAX, and in it we need to make sure that the person saving this can manage options in the first place, and that the nonce field is valid. If all is good, we can update our options. As I’ve said, the two input fields and textarea hold different things in them – the first input field is just some text, so a good way to sanitize it is to use either wp_kses or wp_kses_post functions. Sanitization is important to prevent any unwanted SQL injections into your database. You might be tempted to say: but I’m on the back end, how can someone inject anything here? Never assume you’re safe and always sanitize everything. The second input is for numbers so I used intval which will return the integer value of the variable. In the textarea I’ve put some HTML code. Because of that we need to unquote a quoted string, so that we don’t accidentally break our database.
JavaScript functionality
We have our options page, but if you try to click on the tabs, nothing happens. Same with option save. For that you’re going to need some JavaScript. In your admin.js file add this code
jQuery(document).ready(function($) {
	"use strict";

	// Tabs

	$('.nav-tab').on('click', function(){
		var $this = $(this);
		var tab_id = $this.data('tab');
		if (!$this.hasClass('nav-tab-active')) {
			$('.nav-tab-active').removeClass('nav-tab-active');
			$this.addClass('nav-tab-active');
			if (tab_id == 'tab_1') {
				$('#tab_2').addClass('hidden');
				$('#tab_1').removeClass('hidden');
			} else{
				$('#tab_2').removeClass('hidden');
				$('#tab_1').addClass('hidden');
			}
		}
	});

	// Save first tab meta

	$('#page_options_1 input[type="submit"]').on('click', function(e){
		e.preventDefault();
		var $this = $(this);

		var $form = $this.parent('#page_options_1');
		var str = $form.serialize() + '&action=mythemeslug_options_tab1_save';

		$.ajax({
			type: 'POST',
	    	url: ajaxurl,
	    	dataType : 'html',
			data: str,
			success: function(){
				$('#page_options_1 .saved_options').text(mythemeslug_ajax.settings_saved).delay(2000).fadeOut();
			},
			beforeSend : function () {
				$('#page_options_1 .saved_options').text('').show();
				$('#page_options_1 .spinner').css('visibility', 'visible');
			},
			error : function (jqXHR, textStatus, errorThrown) {
				$('#page_options_1 .saved_options').html(jqXHR + ' :: ' + textStatus + ' :: ' + errorThrown);
			},
			complete : function () {
				$('#page_options_1 .spinner').css('visibility', 'hidden');
			}
		});
		return false;
	});

	// Save second tab meta

	$('#page_options_2 input[type="submit"]').on('click', function(e){
		e.preventDefault();
		var $this = $(this);

		var $form = $this.parent('#page_options_2');
		var str = $form.serialize() + '&action=mythemeslug_options_tab2_save';

		$.ajax({
			type: 'POST',
	    	url: ajaxurl,
	    	dataType : 'html',
			data: str,
			success: function(){
				$('#page_options_2 .saved_options').text(mythemeslug_ajax.settings_saved).delay(2000).fadeOut();
			},
			beforeSend : function () {
				$('#page_options_2 .saved_options').text('').show();
				$('#page_options_2 .spinner').css('visibility', 'visible');
			},
			error : function (jqXHR, textStatus, errorThrown) {
				$('#page_options_2 .saved_options').html(jqXHR + ' :: ' + textStatus + ' :: ' + errorThrown);
			},
			complete : function () {
				$('#page_options_2 .spinner').css('visibility', 'hidden');
			}
		});
		return false;
	});

});Code language: JavaScript (javascript)
The first part will toggle our tabs, and the other two will trigger our AJAX save on click events. You want to call your save actions (mythemeslug_options_tab1_save and mythemeslug_options_tab2_save) on submit click. So you’ll target your submit button, add a click event listener, and prevent the default action from happening, which is the form submit. Without this you’ll get a page refresh – well in our case the action points to # so nothing special will happen, but we want to avoid page refresh. Next you need to serialize your form, and form a data string for our AJAX call.
I actually tried to use object for my data with action set to my action function, and postdata set to my serialized form, but that kinda complicated the extraction of my form variables, so I decided to go with the
var str = $form.serialize() + '&action=mythemeslug_options_tab1_save';Code language: PHP (php)approach instead. Worked like a charm. Next we specify our AJAX settings – dataType, url, etc. and we set up our methods – success, beforeSend, error and complete. Here I’ve added something to notify the user that the options are saved – a little settings saved text and a spinner, which will fade out after 2 seconds. The error part is a great to have when you’re debugging.
Funny story – my server has some issues, and even though I have set up the posts on the front page to load on AJAX, there is some internal server error (which I still haven’t figured out). The error part will give you all the information you need to figure out what can be wrong with your AJAX call. Feel free to add console.log(jqXHR); inside your error method for debugging purposes.
And that’s it for the functionality. All you need is some styling. So add to the /css folder admin_css.css file in which you can add (and you can change this to your liking)
.nav-tab{
	cursor: pointer;
}
.page_options .spinner {
	background: url(/wp-admin/images/spinner.gif) no-repeat;
	-webkit-background-size: 20px 20px;
	background-size: 20px 20px;
	display: inline-block;
	visibility: hidden;
	float:none;
	vertical-align: middle;
	opacity: .7;
	filter: alpha(opacity=70);
	width: 20px;
	height: 20px;
	margin: -2px 10px 0;
}
.saved_options{
	color: #093;
}
.page_options table{
	margin-bottom: 30px;
}
.page_options table td {
    width: 100%;
    white-space: nowrap;
    margin-right: 50px;
}
.page_options input[type="text"]{
    border: 1px solid #ddd;
    -webkit-box-shadow: inset 0 1px 2px rgba(0,0,0,.07);
    box-shadow: inset 0 1px 2px rgba(0,0,0,.07);
    background-color: #fff;
    color: #32373c;
    outline: 0;
    -webkit-transition: 50ms border-color ease-in-out;
    transition: 50ms border-color ease-in-out;
    width: 20%;
}
.page_options textarea{
	width: 20%;
}
.page_options .title{
	width: 16%;
	vertical-align: top;
}
.page_options .title h4{
	margin-top: 0;
}
.page_options .divider{
	border-bottom: 1px solid #ddd;
}
.module_select{
	display: block;
}
.input_field{
	display: block;
}
.input_field label{
	width: 12%;
	vertical-align: top;
	display: inline-block;
}
.hidden{
	display: none;
}
Code language: CSS (css)
And you’re all set. You now have working options page to put your options on. What options you’ll put in is up to you. I used this to add a page for putting banner ad code that appeared on a site, and a layout manager for rearranging the front page layout posts for a client. There really isn’t a limit to what you’ll put on your menu page.
Hope you liked this post and if you have any comments and questions, leave them below : )
Leave a Reply